显示屏
LCD 屏幕显示库
M5 系列显示库说明
1. Display (M5.Lcd)
底层图形库,提供屏幕绘制、文字、线条、颜色管理等基础功能。
可独立使用,适合只需要绘制图形或文字的场景。
Access via:
M5.Lcd.fillRect(),M5.Lcd.drawRect(),M5.Lcd.drawString(), etc.
2. M5Widgets
基础控件库,提供标签、图片显示等 UI 控件。
底层依赖 M5GFX。
适合需要简单交互控件的界面。
Access via:
M5.Widgets.Label(),M5.Widgets.Image(),M5.Widgets.Rectangle(), etc.Important:
M5.Widgetsprovides UI component classes, not drawing methods.
3. M5UI
高层 UI 框架,基于 LVGL 封装。
提供页面管理、多控件布局和统一事件处理。
使用提示
⚠️ 不建议同时混用 M5GFX、M5Widgets、M5UI,可能导致渲染异常或事件冲突。
单独绘图 → 使用 M5GFX。
简单控件交互 → 使用 M5Widgets。
多页面 UI → 使用 M5UI。
Common Mistakes to Avoid
❌ WRONG:
Widgets.fillRect()orWidgets.drawRect()- These methods do not exist in Widgets module✅ CORRECT:
M5.Lcd.fillRect()orM5.Lcd.drawRect()- Use M5.Lcd for drawing methods❌ WRONG:
from M5 import Widgets; Widgets.fillRect(...)- Widgets is for UI components, not drawing✅ CORRECT:
from M5 import *; M5.Lcd.fillRect(...)- M5.Lcd provides all drawing methods
Key Distinction:
- M5.Lcd = Drawing methods (fillRect, drawRect, drawCircle, drawString, etc.)
- M5.Widgets = UI component classes (Label, Image, Rectangle, Circle, etc.)
UiFlow2 应用示例
基础绘图
在 UiFlow2 上打开 cores3_draw_test_example.m5f2 项目。
本示例演示了 M5.Lcd 的基本绘图功能,包括文字、图片、二维码以及各种图形。
UiFlow2 代码块:
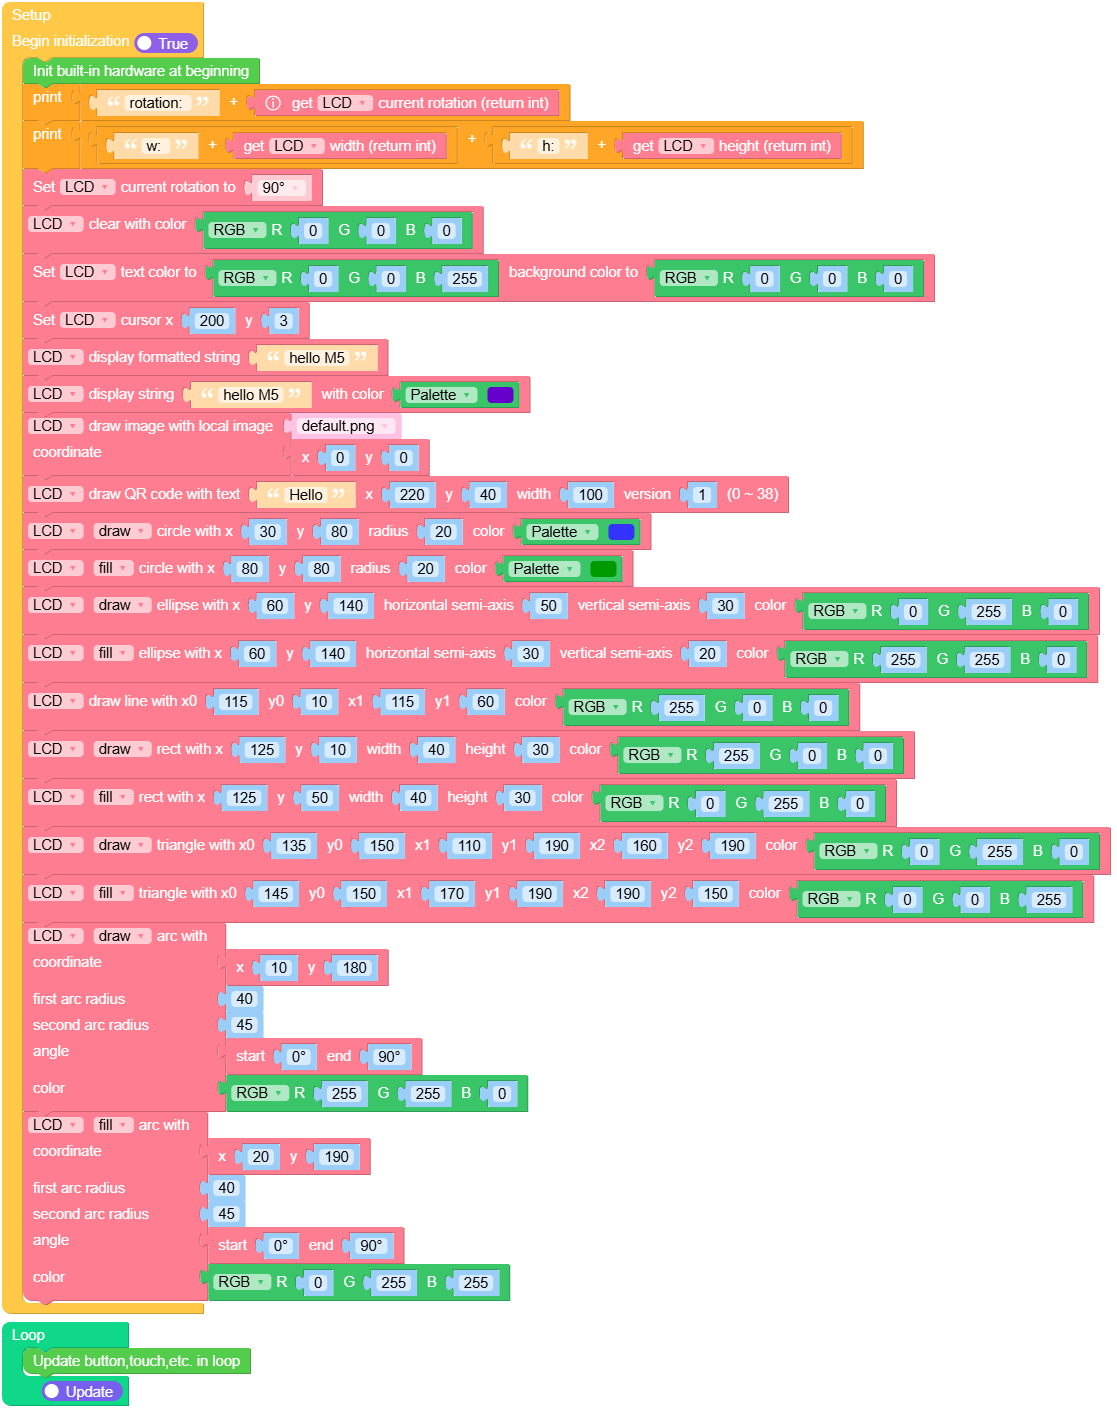
示例输出:
无
画布绘图
在 UiFlow2 上打开 cores3_display_canvas_example.m5f2 项目。
本示例演示了如何创建和使用画布进行绘图。它创建一个 2 位颜色深度的画布,在上面绘制圆形,然后将画布推送到显示屏。
UiFlow2 代码块:
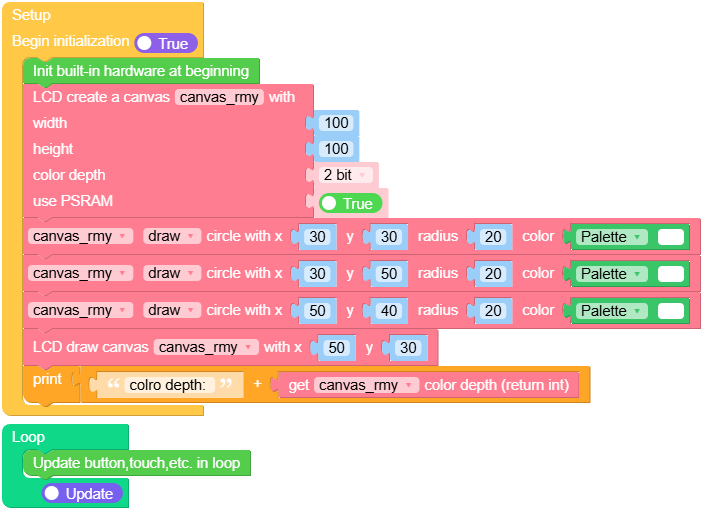
示例输出:
无
MicroPython 应用示例
基础绘图
本示例演示了 M5.Lcd 的基本绘图功能,包括文字、图片、二维码以及各种图形。
MicroPython 代码块:
 1# SPDX-FileCopyrightText: 2026 M5Stack Technology CO LTD
 2#
 3# SPDX-License-Identifier: MIT
 4import os, sys, io
 5import M5
 6from M5 import *
 7
 8
 9def setup():
10    M5.begin()
11    Widgets.setRotation(1)
12    Widgets.fillScreen(0x222222)
13
14    print((str("rotation: ") + str((M5.Display.getRotation()))))
15    print(
16        (
17            str((str("w: ") + str((M5.Display.width()))))
18            + str((str("h:") + str((M5.Display.height()))))
19        )
20    )
21    M5.Display.setRotation(1)
22    M5.Display.clear(0x000000)
23    M5.Display.setTextColor(0x0000FF, 0x000000)
24    M5.Display.setCursor(200, 3)
25    M5.Display.printf("hello M5")
26    M5.Display.print("hello M5", 0x6600CC)
27    M5.Display.drawImage("/flash/res/img/default.png", 0, 0)
28    M5.Display.drawQR("Hello", 220, 40, 100, 1)
29    M5.Display.drawCircle(30, 80, 20, 0x3333FF)
30    M5.Display.fillCircle(80, 80, 20, 0x009900)
31    M5.Display.drawEllipse(60, 140, 50, 30, 0x00FF00)
32    M5.Display.fillEllipse(60, 140, 30, 20, 0xFFFF00)
33    M5.Display.drawLine(115, 10, 115, 60, 0xFF0000)
34    M5.Display.drawRect(125, 10, 40, 30, 0xFF0000)
35    M5.Display.fillRect(125, 50, 40, 30, 0x00FF00)
36    M5.Display.drawTriangle(135, 150, 110, 190, 160, 190, 0x00FF00)
37    M5.Display.fillTriangle(145, 150, 170, 190, 190, 150, 0x0000FF)
38    M5.Display.drawArc(10, 180, 40, 45, 0, 90, 0xFFFF00)
39    M5.Display.fillArc(20, 190, 40, 45, 0, 90, 0x00FFFF)
40
41
42def loop():
43    M5.update()
44
45
46if __name__ == "__main__":
47    try:
48        setup()
49        while True:
50            loop()
51    except (Exception, KeyboardInterrupt) as e:
52        try:
53            from utility import print_error_msg
54
55            print_error_msg(e)
56        except ImportError:
57            print("please update to latest firmware")
示例输出:
无
画布绘图
本示例演示了如何创建和使用画布进行绘图。它创建一个 2 位颜色深度的画布,在上面绘制圆形,然后将画布推送到显示屏。
MicroPython 代码块:
 1# SPDX-FileCopyrightText: 2026 M5Stack Technology CO LTD
 2#
 3# SPDX-License-Identifier: MIT
 4import os, sys, io
 5import M5
 6from M5 import *
 7
 8
 9title0 = None
10canvas_rmy = None
11
12
13def setup():
14    global title0, canvas_rmy
15
16    M5.begin()
17    Widgets.setRotation(1)
18    Widgets.fillScreen(0x222222)
19    title0 = Widgets.Title(
20        "Display canvas example", 3, 0xFFFFFF, 0x0000FF, Widgets.FONTS.Montserrat18
21    )
22
23    canvas_rmy = M5.Display.newCanvas(100, 100, 2, True)
24    canvas_rmy.drawCircle(30, 30, 20, 0xFFFFFF)
25    canvas_rmy.drawCircle(30, 50, 20, 0xFFFFFF)
26    canvas_rmy.drawCircle(50, 40, 20, 0xFFFFFF)
27    canvas_rmy.push(50, 30)
28    print((str("colro depth: ") + str((canvas_rmy.getColorDepth()))))
29
30
31def loop():
32    global title0, canvas_rmy
33    M5.update()
34
35
36if __name__ == "__main__":
37    try:
38        setup()
39        while True:
40            loop()
41    except (Exception, KeyboardInterrupt) as e:
42        try:
43            from utility import print_error_msg
44
45            print_error_msg(e)
46        except ImportError:
47            print("please update to latest firmware")
示例输出:
无
Flicker-free Animation with Canvas
When an animation frame contains several drawing operations, do not erase and redraw
the elements directly on M5.Lcd. The display can expose the intermediate cleared
or partially drawn state, which appears as flicker. Create an off-screen canvas once,
draw the complete frame on the canvas, and call push() once after the frame is ready.
The API name is M5.Lcd (case-sensitive). Create the canvas during setup and reuse it;
creating a new canvas for every frame wastes memory and can cause allocation failures.
import time
import M5
from M5 import *


canvas = None
ball_x = 12
direction = 2


def setup():
    global canvas
    M5.begin()
    # Only the animated region needs a canvas. PSRAM must be available when psram=True.
    canvas = M5.Lcd.newCanvas(w=200, h=80, bpp=16, psram=True)


def loop():
    global ball_x, direction
    M5.update()

    # Build the whole frame off-screen. Nothing below is visible yet.
    canvas.fillRect(0, 0, 200, 80, 0x000000)
    canvas.fillCircle(ball_x, 40, 12, 0x00FF00)
    canvas.setTextColor(0xFFFFFF, 0x000000)
    canvas.drawString("Canvas animation", 8, 8)

    # Present the completed frame in one operation.
    canvas.push(60, 80)

    ball_x += direction
    if ball_x <= 12 or ball_x >= 188:
        direction = -direction
    time.sleep_ms(16)


if __name__ == "__main__":
    setup()
    while True:
        loop()
Use a canvas sized only for the changing region when the rest of the screen is static.
If memory is limited, reduce the canvas dimensions or color depth, or set psram=False
when the target device has no PSRAM. Direct drawing remains appropriate for a single
small update that does not expose intermediate frame states. For multi-step graphics,
sprites, gauges, or animation frames, prefer the canvas-and-single-push() pattern.
API参考
- class M5.Display
- width()
获取显示屏水平分辨率。
- 返回宽度:
水平分辨率。
- Return type:
int
UiFlow2 代码块:

MicroPython 代码块:
Display.width()
- height()
获取显示屏垂直分辨率。
- 返回高度:
垂直分辨率。
- Return type:
int
UiFlow2 代码块:

MicroPython 代码块:
Display.height()
- getRotation()
获取显示屏旋转方向。
- 返回旋转方向:
旋转方向值
- Return type:
int
旋转值:
1:0° 旋转。
2:旋转 90°
3:180° 旋转。
4:270° 旋转。
UiFlow2 代码块:

MicroPython 代码块:
Display.getRotation()
- getColorDepth()
获取显示屏颜色深度。
- 返回颜色深度:
以每像素位数表示的颜色深度。
- Return type:
int
UiFlow2 代码块:

MicroPython 代码块:
Display.getColorDepth()
- getCursor()
获取显示屏绘图光标位置。
- 返回位置:
tuple (x, y) 光标位置。
- Return type:
tuple
UiFlow2 代码块:

MicroPython 代码块:
Display.getCursor()
- setRotation(r)
设置显示屏旋转。
- 参数:
r (int) – 旋转值(1~4):- 1:旋转 0°。- 2:旋转 90°。- 3:旋转 180°。- 4:旋转 270°。
UiFlow2 代码块:

MicroPython 代码块:
Display.setRotation(2)
- setColorDepth(bpp)
设置画布的颜色深度。
- 参数:
bpp (int) – 期望的颜色深度(以每像素位数表示)。
注意:此方法仅适用于画布对象,不适用于显示屏本身。对于 CoreS3 设备,显示屏颜色深度固定为 16 位。
UiFlow2 代码块:

MicroPython 代码块:
Display.setColorDepth(16)
- setEpdMode(epd_mode)
设置显示屏的 EPD 模式。
- 参数:
epd_mode (int) – 所需 EPD 模式 - 0:M5.Lcd.EPDMode.EPD_QUALITY - 1:M5.Lcd.EPDMode.EPD_TEXT - 2:M5.Lcd.EPDMode.EPD_FAST - 3:M5.Lcd.EPDMode.EPD_FASTEST
注意:仅适用于具有 EPD 功能的设备。
UiFlow2 代码块:

MicroPython 代码块:
Display.setEpdMode(2)
- isEPD()
检查显示屏是否为电子墨水屏(EPD)。
- 返回是否为 EPD:
如果显示屏为 EPD,则返回 True,否则返回 False。
- Return type:
bool
UiFlow2 代码块:

MicroPython 代码块:
Display.isEPD()
- setFont(font)
置显示字体。
- 参数:
font –
支持内置字体和字体文件(例如 .bin(lvgl 二进制字体格式)或 .vlw(Processing 字体格式))。可用的内置字体如下:
字体名称
状态
替代字体
不支持的设备
M5.Lcd.FONTS.ASCII7
❌ 已废弃
M5.Lcd.FONTS.Montserrat12
M5.Lcd.FONTS.DejaVu9
❌ 已废弃
M5.Lcd.FONTS.Montserrat12
M5.Lcd.FONTS.DejaVu12
❌ 已废弃
M5.Lcd.FONTS.Montserrat14
M5.Lcd.FONTS.DejaVu18
❌ 已废弃
M5.Lcd.FONTS.Montserrat18
M5.Lcd.FONTS.DejaVu24
❌ 已废弃
M5.Lcd.FONTS.Montserrat24
M5.Lcd.FONTS.DejaVu40
❌ 已废弃
M5.Lcd.FONTS.Montserrat40
M5.Lcd.FONTS.DejaVu56
❌ 已废弃
M5.Lcd.FONTS.Montserrat44
M5.Lcd.FONTS.DejaVu72
❌ 已废弃
M5.Lcd.FONTS.Montserrat48
M5.Lcd.FONTS.EFontCN24
❌ 已废弃
M5.Lcd.FONTS.AlibabaPuHuiTiCN24
M5.Lcd.FONTS.EFontJA24
❌ 已废弃
M5.Lcd.FONTS.AlibabaSansJA24
M5.Lcd.FONTS.EFontKR24
❌ 已废弃
M5.Lcd.FONTS.AlibabaSansKR24
M5.Lcd.FONTS.Montserrat12
✅ 推荐
M5.Lcd.FONTS.Montserrat14
✅ 推荐
M5.Lcd.FONTS.Montserrat16
✅ 推荐
M5.Lcd.FONTS.Montserrat18
✅ 推荐
M5.Lcd.FONTS.Montserrat24
✅ 推荐
M5.Lcd.FONTS.Montserrat40
✅ 推荐
M5.Lcd.FONTS.Montserrat48
✅ 推荐
M5.Lcd.FONTS.AlibabaPuHuiTiCN24
✅ 推荐
M5STACK_StickC_PLUS, M5STACK_CoreInk, M5STACK_StickC,
M5STACK_Atom_Lite, M5STACK_Stamp_PICO, M5STACK_Atom_Matrix,
M5STACK_AtomU, M5STACK_Atom_Echo, M5STACK_NanoC6
M5.Lcd.FONTS.AlibabaSansJA24
✅ 推荐
M5.Lcd.FONTS.AlibabaSansKR24
✅ 推荐
UiFlow2 代码块:

MicroPython 代码块:
Display.setFont(M5.Lcd.FONTS.DejaVu18)
- setTextColor(fgcolor, bgcolor)
设置文本颜色和背景颜色。
UiFlow2 代码块:

MicroPython 代码块:
Display.setTextColor(0xFF0000, 0x000000)
- setTextScroll(scroll)
启用或禁用文本滚动。
- 参数:
scroll (bool) – 设置为 True 启用文本滚动,设置为 False 禁用文本滚动。默认值为 False。
UiFlow2 代码块:

MicroPython 代码块:
Display.setTextScroll(True)
- setTextSize(size)
设置文本的大小。
- 参数:
size (int) – 期望的文本大小。
UiFlow2 代码块:

MicroPython 代码块:
Display.setTextSize(2)
- setCursor(x, y)
设置光标位置。
UiFlow2 代码块:

MicroPython 代码块:
Display.setCursor(10, 20)
- clear(color)
使用指定颜色清空显示屏
- 参数:
color (int) – 填充颜色,使用 RGB888 格式(默认值为 0)。
警告
Avoid calling
clear()inside a loop or event handler — it redraws every pixel and causes visible flickering. For dynamic content, usefillRect()to erase only the changed region, then draw the new content on top.UiFlow2 代码块:

MicroPython 代码块:
Display.clear(0xFFFFFF)
- fillScreen(color)
用指定颜色填充整个屏幕。
- 参数:
color (int) – 填充颜色,使用 RGB888 格式(默认值为 0)。
警告
Avoid calling
fillScreen()inside a loop or event handler — it redraws every pixel and causes visible flickering. Draw static backgrounds once during setup. For dynamic updates, usefillRect()to clear only the changed area.UiFlow2 代码块:

MicroPython 代码块:
Display.fillScreen(0xFF0000)
- drawPixel(x, y, color)
在屏幕上绘制单个像素。
UiFlow2 代码块:

MicroPython 代码块:
Display.drawPixel(50, 50, 0x00FF00)
- drawCircle(x, y, r, color)
绘制一个圆。
- 参数:
UiFlow2 代码块:

MicroPython 代码块:
Display.drawCircle(60, 60, 20, 0x0000FF)
- fillCircle(x, y, r, color)
绘制一个实心圆。
- 参数:
UiFlow2 代码块:

MicroPython 代码块:
Display.fillCircle(60, 60, 20, 0x00FFFF)
- drawEllipse(x, y, rx, ry, color)
绘制一个椭圆。
- 参数:
UiFlow2 代码块:

MicroPython 代码块:
Display.drawEllipse(80, 40, 30, 20, 0xFF00FF)
- fillEllipse(x, y, rx, ry, color)
绘制一个实心椭圆。
- 参数:
UiFlow2 代码块:

MicroPython 代码块:
Display.fillEllipse(80, 40, 30, 20, 0x00FF00)
- drawLine(x0, y0, x1, y1, color)
绘制一条直线。
- 参数:
UiFlow2 代码块:

MicroPython 代码块:
Display.drawLine(10, 10, 100, 100, 0xFF0000)
- drawRect(x, y, w, h, color)
绘制一个矩形。
- 参数:
UiFlow2 代码块:

MicroPython 代码块:
display.drawRect(20, 20, 80, 50, 0x00FF00)
- fillRect(x, y, w, h, color)
绘制一个填充矩形。
- 参数:
UiFlow2 代码块:

MicroPython 代码块:
Display.fillRect(20, 20, 80, 50, 0x0000FF)
- drawRoundRect(x, y, w, h, r, color)
绘制一个圆角矩形。
- 参数:
UiFlow2 代码块:

MicroPython 代码块:
Display.drawRoundRect(30, 30, 60, 40, 10, 0xFF00FF)
- fillRoundRect(x, y, w, h, r, color)
绘制一个填充圆角矩形。
- 参数:
UiFlow2 代码块:

MicroPython 代码块:
Display.fillRoundRect(30, 30, 60, 40, 10, 0x00FFFF)
- drawTriangle(x0, y0, x1, y1, x2, y2, color)
绘制一个三角形。
- 参数:
UiFlow2 代码块:

MicroPython 代码块:
Display.drawTriangle(10, 10, 50, 80, 90, 10, 0xFF0000)
- fillTriangle(x0, y0, x1, y1, x2, y2, color)
绘制一个填充三角形。
- 参数:
UiFlow2 代码块:

MicroPython 代码块:
Display.fillTriangle(10, 10, 50, 80, 90, 10, 0x00FF00)
- drawArc(x, y, r0, r1, angle0, angle1, color)
绘制一个弧线。
- 参数:
UiFlow2 代码块:
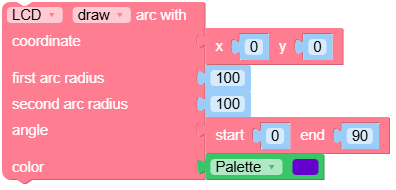
MicroPython 代码块:
Display.drawArc(50, 50, 20, 30, 0, 180, 0xFF0000)
- fillArc(x, y, r0, r1, angle0, angle1, color)
绘制一个填充弧线。
- 参数:
UiFlow2 代码块:
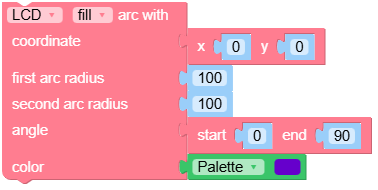
MicroPython 代码块:
Display.fillArc(50, 50, 20, 30, 0, 180, 0x00FF00)
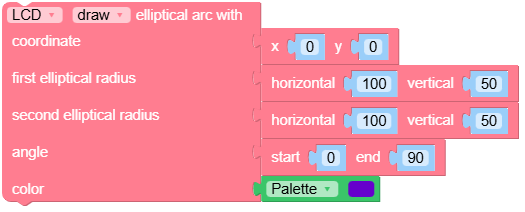
- drawEllipseArc(x, y, r0x, r1x, r0y, r1y, angle0, angle1, color)
绘制一个椭圆弧线。
- 参数:
UiFlow2 代码块:
MicroPython 代码块:
Display.drawEllipseArc(50, 50, 20, 40, 10, 30, 0, 180, 0xFF00FF)
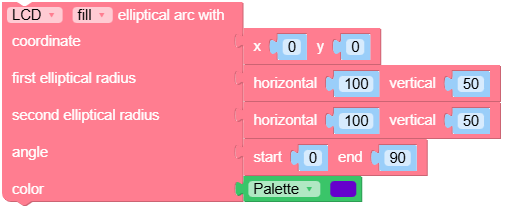
- fillEllipseArc(x, y, r0x, r1x, r0y, r1y, angle0, angle1, color)
绘制一个填充椭圆弧线。
- 参数:
UiFlow2 代码块:
MicroPython 代码块:
Display.fillEllipseArc(50, 50, 20, 40, 10, 30, 0, 180, 0x00FFFF)
- drawQR(text, x, y, w, version)
绘制二维码。
- 参数:
UiFlow2 代码块:

MicroPython 代码块:
Display.drawQR("Hello", 0, 0, 200)
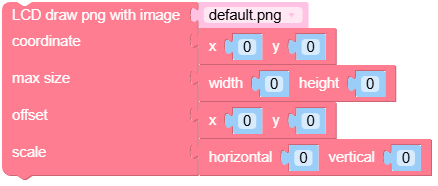
- drawPng(img, x, y, maxW, maxH, offX, offY, scaleX, scaleY)
绘制 PNG 图片。
- 参数:
UiFlow2 代码块:
MicroPython 代码块:
Display.drawPng("res/img/uiflow.png", 0, 0)
示例:
Display.drawPng("res/img/uiflow.png", 0, 0)
img = open("res/img/uiflow.png", "b")
img.seek(0)
Display.drawPng(img.read(), 0, 100)
img.close()
- drawJpg(img, x, y, maxW, maxH, offX, offY)
绘制 JPG 图片。
- 参数:
UiFlow2 代码块:

MicroPython 代码块:
Display.drawJpg("res/img/uiflow.jpg", 0, 0)
示例:
Display.drawJpg("res/img/uiflow.jpg", 0, 0)
img = open("res/img/uiflow.jpg", "b")
img.seek(0)
Display.drawJpg(img.read(), 0, 100)
img.close()
- drawBmp(img, x, y, maxW, maxH, offX, offY)
绘制 BMP 图片。
- 参数:
UiFlow2 代码块:

MicroPython 代码块:
Display.drawBmp("res/img/uiflow.bmp", 0, 0)
示例:
Display.drawBmp("res/img/uiflow.bmp", 0, 0)
img = open("res/img/uiflow.bmp", "b")
img.seek(0)
Display.drawBmp(img.read(), 0, 100)
img.close()
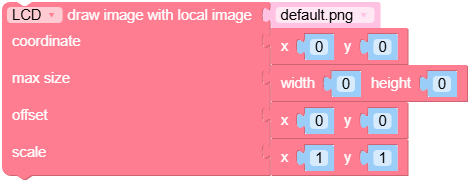
- drawImage(img, x, y, maxW, maxH, offX, offY)
绘制图片。
- 参数:
UiFlow2 代码块:
MicroPython 代码块:
img = open("res/img/uiflow.jpg", "b")
示例:
img = open("res/img/uiflow.jpg", "b")
img.seek(0)
Display.drawImage(img.read(), 0, 0)
img.close()
- drawRawBuf(buf, x, y, w, h, len, swap)
绘制缓冲区中的图片。
- 参数:
UiFlow2 代码块:
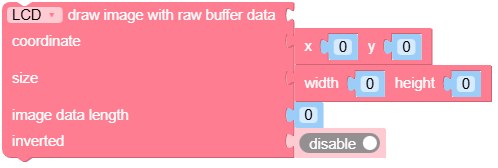
MicroPython 代码块:
Display.drawRawBuf(raw_buf, 0, 0, 100, 100, len(raw_buf), swap=False)
示例:
width, height = 40, 30
green565 = 0x07E0
raw_buf = bytearray(width * height * 2)
for i in range(width * height):
    raw_buf[2*i]   = (green565 >> 8) & 0xFF
    raw_buf[2*i+1] = green565 & 0xFF
Display.drawRawBuf(raw_buf, 100, 100, width, height, len(raw_buf), swap=False)
- print(text, color)
显示字符串(不支持格式化)。
UiFlow2 代码块:

MicroPython 代码块:
Display.print("Hello World", color=0xFF0000)
- printf(text)
显示格式化字符串。
- 参数:
text (str) – 要显示的格式化字符串。
UiFlow2 代码块:

MicroPython 代码块:
Display.printf("Value: %d" % 100)
- newCanvas(w, h, bpp, psram)
Create an off-screen canvas. Use it to compose a complete animation frame before presenting the frame with a single
push(x, y)call. Reuse the returned object instead of creating it repeatedly in the main loop.UiFlow2 代码块:
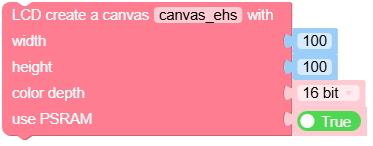
MicroPython 代码块:
w1 = Display.newCanvas(w=100, h=100, bpp=16)
示例:
w1 = Display.newCanvas(w=100, h=100, bpp=16)
w1.drawImage("res/img/uiflow.jpg", 80, 0)
w1.push(30, 0)
- startWrite()
开始向显示屏写入内容。
UiFlow2 代码块:

MicroPython 代码块:
Display.startWrite()
示例:
Display.startWrite()
Display.drawPixel(10, 10, 0xFF0000)
Display.endWrite()
- endWrite()
结束显示屏写入。
UiFlow2 代码块:

MicroPython 代码块:
Display.endWrite()