Display
A lcd display library
M5 Series Display Libraries
1. Display (M5.Lcd)
A low-level graphics library providing basic screen drawing, text, lines, and color management.
Can be used independently, suitable for scenarios that only require drawing graphics or text.
Access via:
M5.Lcd.fillRect(),M5.Lcd.drawRect(),M5.Lcd.drawString(), etc.
2. M5Widgets
A basic UI widget library providing labels, image displays, and other UI controls.
Built on top of M5GFX.
Suitable for simple interactive UI elements.
Access via:
M5.Widgets.Label(),M5.Widgets.Image(),M5.Widgets.Rectangle(), etc.Important:
M5.Widgetsprovides UI component classes, not drawing methods.
3. M5UI
A high-level UI framework based on LVGL.
Provides page management, multi-widget layouts, and unified event handling.
Usage Tips
⚠️ Do not mix M5GFX, M5Widgets, and M5UI simultaneously, as it may cause rendering issues or event conflicts.
For graphics-only drawing → use M5GFX.
For simple interactive widgets → use M5Widgets.
For multi-page UI → use M5UI.
Common Mistakes to Avoid
❌ WRONG:
Widgets.fillRect()orWidgets.drawRect()- These methods do not exist in Widgets module✅ CORRECT:
M5.Lcd.fillRect()orM5.Lcd.drawRect()- Use M5.Lcd for drawing methods❌ WRONG:
from M5 import Widgets; Widgets.fillRect(...)- Widgets is for UI components, not drawing✅ CORRECT:
from M5 import *; M5.Lcd.fillRect(...)- M5.Lcd provides all drawing methods
Key Distinction:
- M5.Lcd = Drawing methods (fillRect, drawRect, drawCircle, drawString, etc.)
- M5.Widgets = UI component classes (Label, Image, Rectangle, Circle, etc.)
UiFlow2 Example
Basic Drawing
Open the cores3_draw_test_example.m5f2 project in UiFlow2.
This example demonstrates basic drawing functions of Display, including text, images, QR code, and various shapes.
UiFlow2 Code Block:
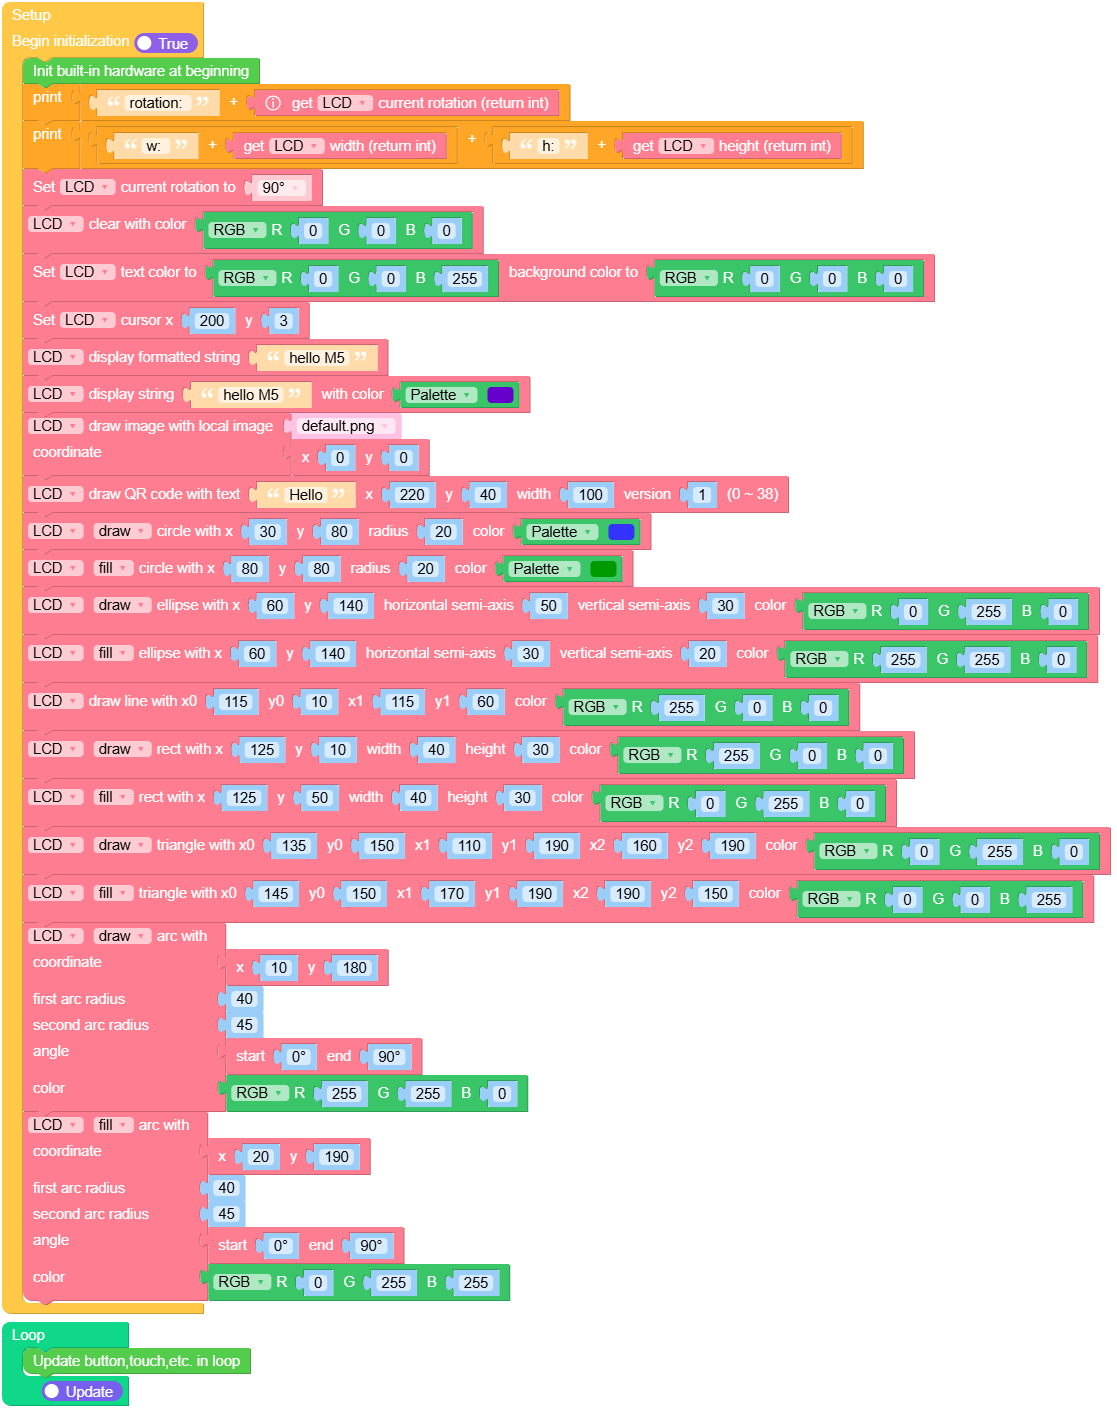
Example output:
None
Canvas Drawing
Open the cores3_display_canvas_example.m5f2 project in UiFlow2.
This example demonstrates how to create and use a canvas for drawing. It creates a canvas with 2-bit color depth, draws circles on it, and then pushes the canvas to the display.
UiFlow2 Code Block:
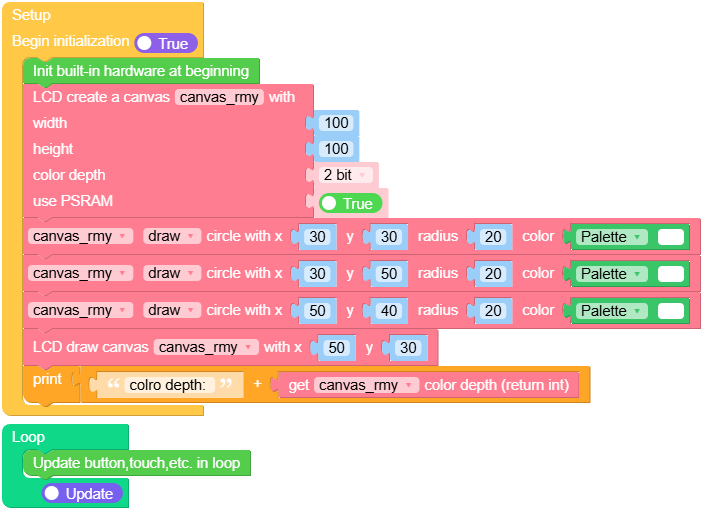
Example output:
None
MicroPython Example
Basic Drawing
This example demonstrates basic drawing functions of Display, including text, images, QR code, and various shapes.
MicroPython Code Block:
 1# SPDX-FileCopyrightText: 2026 M5Stack Technology CO LTD
 2#
 3# SPDX-License-Identifier: MIT
 4import os, sys, io
 5import M5
 6from M5 import *
 7
 8
 9def setup():
10    M5.begin()
11    Widgets.setRotation(1)
12    Widgets.fillScreen(0x222222)
13    print((str("rotation: ") + str((M5.Lcd.getRotation()))))
14    print((str((str("w: ") + str((M5.Lcd.width())))) + str((str("h:") + str((M5.Lcd.height()))))))
15    M5.Lcd.setRotation(1)
16    M5.Lcd.clear(0x000000)
17    M5.Lcd.setTextColor(0x0000FF, 0x000000)
18    M5.Lcd.setCursor(200, 3)
19    M5.Lcd.printf("hello M5")
20    M5.Lcd.print("hello M5", 0x6600CC)
21    M5.Lcd.drawImage("/flash/res/img/default.png", 0, 0)
22    M5.Lcd.drawQR("Hello", 220, 40, 100, 1)
23    M5.Lcd.drawCircle(30, 80, 20, 0x3333FF)
24    M5.Lcd.fillCircle(80, 80, 20, 0x009900)
25    M5.Lcd.drawEllipse(60, 140, 50, 30, 0x00FF00)
26    M5.Lcd.fillEllipse(60, 140, 30, 20, 0xFFFF00)
27    M5.Lcd.drawLine(115, 10, 115, 60, 0xFF0000)
28    M5.Lcd.drawRect(125, 10, 40, 30, 0xFF0000)
29    M5.Lcd.fillRect(125, 50, 40, 30, 0x00FF00)
30    M5.Lcd.drawTriangle(135, 150, 110, 190, 160, 190, 0x00FF00)
31    M5.Lcd.fillTriangle(145, 150, 170, 190, 190, 150, 0x0000FF)
32    M5.Lcd.drawArc(10, 180, 40, 45, 0, 90, 0xFFFF00)
33    M5.Lcd.fillArc(20, 190, 40, 45, 0, 90, 0x00FFFF)
34
35
36def loop():
37    M5.update()
38
39
40if __name__ == "__main__":
41    try:
42        setup()
43        while True:
44            loop()
45    except (Exception, KeyboardInterrupt) as e:
46        try:
47            from utility import print_error_msg
48
49            print_error_msg(e)
50        except ImportError:
51            print("please update to latest firmware")
Example output:
None
Canvas Drawing
This example demonstrates how to create and use a canvas for drawing. It creates a canvas with 2-bit color depth, draws circles on it, and then pushes the canvas to the display.
MicroPython Code Block:
 1# SPDX-FileCopyrightText: 2026 M5Stack Technology CO LTD
 2#
 3# SPDX-License-Identifier: MIT
 4import os, sys, io
 5import M5
 6from M5 import *
 7
 8
 9title0 = None
10
11
12def setup():
13    global title0
14    M5.begin()
15    Widgets.setRotation(1)
16    Widgets.fillScreen(0x222222)
17    title0 = Widgets.Title("Display canvas example", 3, 0xFFFFFF, 0x0000FF, Widgets.FONTS.DejaVu18)
18    canvas_rmy = M5.Lcd.newCanvas(100, 100, 2, True)
19    canvas_rmy.drawCircle(30, 30, 20, 0xFFFFFF)
20    canvas_rmy.drawCircle(30, 50, 20, 0xFFFFFF)
21    canvas_rmy.drawCircle(50, 40, 20, 0xFFFFFF)
22    canvas_rmy.push(50, 30)
23    print((str("colro depth: ") + str((canvas_rmy.getColorDepth()))))
24
25
26def loop():
27    global title0
28    M5.update()
29
30
31if __name__ == "__main__":
32    try:
33        setup()
34        while True:
35            loop()
36    except (Exception, KeyboardInterrupt) as e:
37        try:
38            from utility import print_error_msg
39
40            print_error_msg(e)
41        except ImportError:
42            print("please update to latest firmware")
Example output:
None
Flicker-free Animation with Canvas
When an animation frame contains several drawing operations, do not erase and redraw
the elements directly on M5.Lcd. The display can expose the intermediate cleared
or partially drawn state, which appears as flicker. Create an off-screen canvas once,
draw the complete frame on the canvas, and call push() once after the frame is ready.
The API name is M5.Lcd (case-sensitive). Create the canvas during setup and reuse it;
creating a new canvas for every frame wastes memory and can cause allocation failures.
import time
import M5
from M5 import *


canvas = None
ball_x = 12
direction = 2


def setup():
    global canvas
    M5.begin()
    # Only the animated region needs a canvas. PSRAM must be available when psram=True.
    canvas = M5.Lcd.newCanvas(w=200, h=80, bpp=16, psram=True)


def loop():
    global ball_x, direction
    M5.update()

    # Build the whole frame off-screen. Nothing below is visible yet.
    canvas.fillRect(0, 0, 200, 80, 0x000000)
    canvas.fillCircle(ball_x, 40, 12, 0x00FF00)
    canvas.setTextColor(0xFFFFFF, 0x000000)
    canvas.drawString("Canvas animation", 8, 8)

    # Present the completed frame in one operation.
    canvas.push(60, 80)

    ball_x += direction
    if ball_x <= 12 or ball_x >= 188:
        direction = -direction
    time.sleep_ms(16)


if __name__ == "__main__":
    setup()
    while True:
        loop()
Use a canvas sized only for the changing region when the rest of the screen is static.
If memory is limited, reduce the canvas dimensions or color depth, or set psram=False
when the target device has no PSRAM. Direct drawing remains appropriate for a single
small update that does not expose intermediate frame states. For multi-step graphics,
sprites, gauges, or animation frames, prefer the canvas-and-single-push() pattern.
API
- class M5.Display
- width()
Get the horizontal resolution of the display.
- Returns width:
horizontal resolution in pixels.
- Return type:
int
UiFlow2 Code Block:

MicroPython Code Block:
Display.width()
- height()
Get the vertical resolution of the display.
- Returns height:
vertical resolution in pixels.
- Return type:
int
UiFlow2 Code Block:

MicroPython Code Block:
Display.height()
- getRotation()
Get the current rotation of the display.
- Returns rotation:
display rotation value.
- Return type:
int
Rotation values:
1: 0° rotation
2: 90° rotation
3: 180° rotation
4: 270° rotation
UiFlow2 Code Block:

MicroPython Code Block:
Display.getRotation()
- getColorDepth()
Get the color depth of the display.
- Returns depth:
color depth in bits per pixel.
- Return type:
int
UiFlow2 Code Block:

MicroPython Code Block:
Display.getColorDepth()
- getCursor()
Get the current cursor position on the display.
- Returns pos:
tuple (x, y) of cursor position.
- Return type:
tuple
UiFlow2 Code Block:

MicroPython Code Block:
Display.getCursor()
- setRotation(r)
Set the rotation of the display.
- Parameters:
r (int) – rotation value (1~4) - 1: 0° rotation - 2: 90° rotation - 3: 180° rotation - 4: 270° rotation
UiFlow2 Code Block:

MicroPython Code Block:
Display.setRotation(2)
- setColorDepth(bpp)
Set the color depth of the canvas.
- Parameters:
bpp (int) – desired color depth in bits per pixel.
Notes: This method only applies to canvas objects, not the display itself. For CoreS3 devices, the display color depth is fixed at 16 bits.
UiFlow2 Code Block:

MicroPython Code Block:
Display.setColorDepth(16)
- setEpdMode(epd_mode)
Set the EPD mode for the display.
- Parameters:
epd_mode (int) – desired EPD mode - 0: M5.Lcd.EPDMode.EPD_QUALITY - 1: M5.Lcd.EPDMode.EPD_TEXT - 2: M5.Lcd.EPDMode.EPD_FAST - 3: M5.Lcd.EPDMode.EPD_FASTEST
Notes: Only applicable to devices with EPD capabilities.
UiFlow2 Code Block:

MicroPython Code Block:
Display.setEpdMode(2)
- isEPD()
Check if the display is an EPD (Electronic Paper Display).
- Returns is_epd:
True if the display is EPD, False otherwise.
- Return type:
bool
UiFlow2 Code Block:

MicroPython Code Block:
Display.isEPD()
- setFont(font)
Set the font for the display.
- Parameters:
font –
support built-in font and font file(e.g., .bin(lvgl binary font format) or .vlw(Processing font format)). The following built-in fonts are available:
Font Name
Status
Alternatives
Unsupported Devices
M5.Lcd.FONTS.ASCII7
❌ Deprecated
M5.Lcd.FONTS.Montserrat12
M5.Lcd.FONTS.DejaVu9
❌ Deprecated
M5.Lcd.FONTS.Montserrat12
M5.Lcd.FONTS.DejaVu12
❌ Deprecated
M5.Lcd.FONTS.Montserrat14
M5.Lcd.FONTS.DejaVu18
❌ Deprecated
M5.Lcd.FONTS.Montserrat18
M5.Lcd.FONTS.DejaVu24
❌ Deprecated
M5.Lcd.FONTS.Montserrat24
M5.Lcd.FONTS.DejaVu40
❌ Deprecated
M5.Lcd.FONTS.Montserrat40
M5.Lcd.FONTS.DejaVu56
❌ Deprecated
M5.Lcd.FONTS.Montserrat44
M5.Lcd.FONTS.DejaVu72
❌ Deprecated
M5.Lcd.FONTS.Montserrat48
M5.Lcd.FONTS.EFontCN24
❌ Deprecated
M5.Lcd.FONTS.AlibabaPuHuiTiCN24
M5.Lcd.FONTS.EFontJA24
❌ Deprecated
M5.Lcd.FONTS.AlibabaSansJA24
M5.Lcd.FONTS.EFontKR24
❌ Deprecated
M5.Lcd.FONTS.AlibabaSansKR24
M5.Lcd.FONTS.Montserrat12
✅ Recommended
M5.Lcd.FONTS.Montserrat14
✅ Recommended
M5.Lcd.FONTS.Montserrat16
✅ Recommended
M5.Lcd.FONTS.Montserrat18
✅ Recommended
M5.Lcd.FONTS.Montserrat24
✅ Recommended
M5.Lcd.FONTS.Montserrat40
✅ Recommended
M5.Lcd.FONTS.Montserrat48
✅ Recommended
M5.Lcd.FONTS.AlibabaPuHuiTiCN24
✅ Recommended
M5STACK_StickC_PLUS, M5STACK_CoreInk, M5STACK_StickC,
M5STACK_Atom_Lite, M5STACK_Stamp_PICO, M5STACK_Atom_Matrix,
M5STACK_AtomU, M5STACK_Atom_Echo, M5STACK_NanoC6
M5.Lcd.FONTS.AlibabaSansJA24
✅ Recommended
M5.Lcd.FONTS.AlibabaSansKR24
✅ Recommended
UiFlow2 Code Block:

MicroPython Code Block:
Display.setFont(M5.Lcd.FONTS.DejaVu18)
- setTextColor(fgcolor, bgcolor)
Set the text color and background color.
- Parameters:
UiFlow2 Code Block:

MicroPython Code Block:
Display.setTextColor(0xFF0000, 0x000000)
- setTextScroll(scroll)
Enable or disable text scrolling.
- Parameters:
scroll (bool) – True to enable text scrolling, False to disable (default False)
UiFlow2 Code Block:

MicroPython Code Block:
Display.setTextScroll(True)
- setTextSize(size)
Set the size of the text.
- Parameters:
size (int) – desired text size
UiFlow2 Code Block:
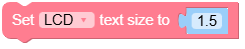
MicroPython Code Block:
Display.setTextSize(2)
- setCursor(x, y)
Set the cursor position.
- Parameters:
UiFlow2 Code Block:

MicroPython Code Block:
Display.setCursor(10, 20)
- clear(color)
Clear the display with a specific color.
- Parameters:
color (int) – fill color in RGB888 format (default 0)
Warning
Avoid calling
clear()inside a loop or event handler — it redraws every pixel and causes visible flickering. For dynamic content, usefillRect()to erase only the changed region, then draw the new content on top.UiFlow2 Code Block:

MicroPython Code Block:
Display.clear(0xFFFFFF)
- fillScreen(color)
Fill the entire screen with a specified color.
- Parameters:
color (int) – fill color in RGB888 format (default 0)
Warning
Avoid calling
fillScreen()inside a loop or event handler — it redraws every pixel and causes visible flickering. Draw static backgrounds once during setup. For dynamic updates, usefillRect()to clear only the changed area.UiFlow2 Code Block:

MicroPython Code Block:
Display.fillScreen(0xFF0000)
- drawPixel(x, y, color)
Draw a single pixel on the screen.
- Parameters:
UiFlow2 Code Block:

MicroPython Code Block:
Display.drawPixel(50, 50, 0x00FF00)
- drawCircle(x, y, r, color)
Draw an outline of a circle.
- Parameters:
UiFlow2 Code Block:

MicroPython Code Block:
Display.drawCircle(60, 60, 20, 0x0000FF)
- fillCircle(x, y, r, color)
Draw a filled circle.
- Parameters:
UiFlow2 Code Block:

MicroPython Code Block:
Display.fillCircle(60, 60, 20, 0x00FFFF)
- drawEllipse(x, y, rx, ry, color)
Draw an outline of an ellipse.
- Parameters:
UiFlow2 Code Block:

MicroPython Code Block:
Display.drawEllipse(80, 40, 30, 20, 0xFF00FF)
- fillEllipse(x, y, rx, ry, color)
Draw a filled ellipse.
- Parameters:
UiFlow2 Code Block:

MicroPython Code Block:
Display.fillEllipse(80, 40, 30, 20, 0x00FF00)
- drawLine(x0, y0, x1, y1, color)
Draw a line.
- Parameters:
UiFlow2 Code Block:

MicroPython Code Block:
Display.drawLine(10, 10, 100, 100, 0xFF0000)
- drawRect(x, y, w, h, color)
Draw a rectangle.
- Parameters:
UiFlow2 Code Block:

MicroPython Code Block:
display.drawRect(20, 20, 80, 50, 0x00FF00)
- fillRect(x, y, w, h, color)
Draw a filled rectangle.
- Parameters:
UiFlow2 Code Block:

MicroPython Code Block:
Display.fillRect(20, 20, 80, 50, 0x0000FF)
- drawRoundRect(x, y, w, h, r, color)
Draw a rounded rectangle.
- Parameters:
UiFlow2 Code Block:

MicroPython Code Block:
Display.drawRoundRect(30, 30, 60, 40, 10, 0xFF00FF)
- fillRoundRect(x, y, w, h, r, color)
Draw a filled rounded rectangle.
- Parameters:
UiFlow2 Code Block:

MicroPython Code Block:
Display.fillRoundRect(30, 30, 60, 40, 10, 0x00FFFF)
- drawTriangle(x0, y0, x1, y1, x2, y2, color)
Draw a triangle.
- Parameters:
x0 (int) – first vertex x-coordinate (default -1)
y0 (int) – first vertex y-coordinate (default -1)
x1 (int) – second vertex x-coordinate (default -1)
y1 (int) – second vertex y-coordinate (default -1)
x2 (int) – third vertex x-coordinate (default -1)
y2 (int) – third vertex y-coordinate (default -1)
color (int) – triangle color in RGB888 format (default 0)
UiFlow2 Code Block:

MicroPython Code Block:
Display.drawTriangle(10, 10, 50, 80, 90, 10, 0xFF0000)
- fillTriangle(x0, y0, x1, y1, x2, y2, color)
Draw a filled triangle.
- Parameters:
x0 (int) – first vertex x-coordinate (default -1)
y0 (int) – first vertex y-coordinate (default -1)
x1 (int) – second vertex x-coordinate (default -1)
y1 (int) – second vertex y-coordinate (default -1)
x2 (int) – third vertex x-coordinate (default -1)
y2 (int) – third vertex y-coordinate (default -1)
color (int) – fill color in RGB888 format (default 0)
UiFlow2 Code Block:

MicroPython Code Block:
Display.fillTriangle(10, 10, 50, 80, 90, 10, 0x00FF00)
- drawArc(x, y, r0, r1, angle0, angle1, color)
Draw an arc.
- Parameters:
x (int) – center x-coordinate (default -1)
y (int) – center y-coordinate (default -1)
r0 (int) – first radius (default -1)
r1 (int) – second radius (default -1)
angle0 (int) – starting angle in degrees (default -1)
angle1 (int) – ending angle in degrees (default -1)
color (int) – arc color in RGB888 format (default 0)
UiFlow2 Code Block:
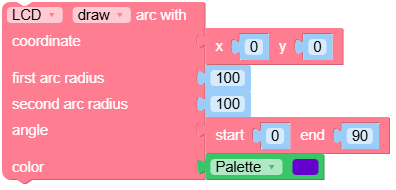
MicroPython Code Block:
Display.drawArc(50, 50, 20, 30, 0, 180, 0xFF0000)
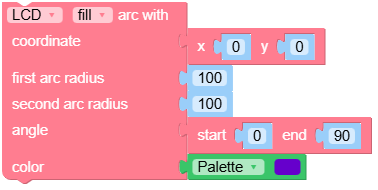
- fillArc(x, y, r0, r1, angle0, angle1, color)
Draw a filled arc.
- Parameters:
x (int) – center x-coordinate (default -1)
y (int) – center y-coordinate (default -1)
r0 (int) – first radius (default -1)
r1 (int) – second radius (default -1)
angle0 (int) – starting angle in degrees (default -1)
angle1 (int) – ending angle in degrees (default -1)
color (int) – fill color in RGB888 format (default 0)
UiFlow2 Code Block:
MicroPython Code Block:
Display.fillArc(50, 50, 20, 30, 0, 180, 0x00FF00)
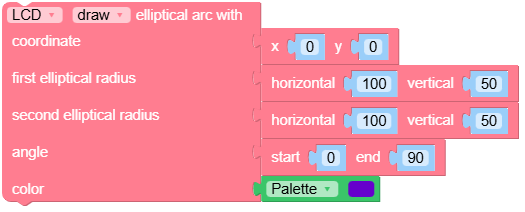
- drawEllipseArc(x, y, r0x, r1x, r0y, r1y, angle0, angle1, color)
Draw an elliptical arc.
- Parameters:
x (int) – center x-coordinate (default -1)
y (int) – center y-coordinate (default -1)
r0x (int) – first horizontal radius (default -1)
r1x (int) – second horizontal radius (default -1)
r0y (int) – first vertical radius (default -1)
r1y (int) – second vertical radius (default -1)
angle0 (int) – starting angle in degrees (default -1)
angle1 (int) – ending angle in degrees (default 0)
color (int) – arc color in RGB888 format (default 0)
UiFlow2 Code Block:
MicroPython Code Block:
Display.drawEllipseArc(50, 50, 20, 40, 10, 30, 0, 180, 0xFF00FF)
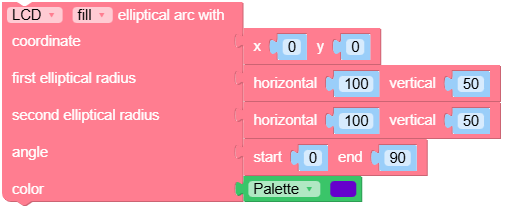
- fillEllipseArc(x, y, r0x, r1x, r0y, r1y, angle0, angle1, color)
Draw a filled elliptical arc.
- Parameters:
x (int) – center x-coordinate (default -1)
y (int) – center y-coordinate (default -1)
r0x (int) – first horizontal radius (default -1)
r1x (int) – second horizontal radius (default -1)
r0y (int) – first vertical radius (default -1)
r1y (int) – second vertical radius (default -1)
angle0 (int) – starting angle in degrees (default -1)
angle1 (int) – ending angle in degrees (default 0)
color (int) – fill color in RGB888 format (default 0)
UiFlow2 Code Block:
MicroPython Code Block:
Display.fillEllipseArc(50, 50, 20, 40, 10, 30, 0, 180, 0x00FFFF)
- drawQR(text, x, y, w, version)
Draw a QR code.
- Parameters:
UiFlow2 Code Block:

MicroPython Code Block:
Display.drawQR("Hello", 0, 0, 200)
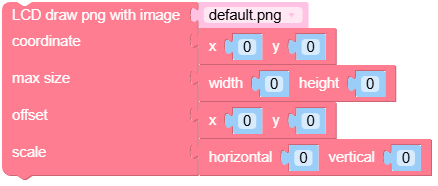
- drawPng(img, x, y, maxW, maxH, offX, offY, scaleX, scaleY)
Draw a PNG image.
- Parameters:
img (str) – image path or data
x (int) – display x-coordinate (default 0)
y (int) – display y-coordinate (default 0)
maxW (int) – max width to draw (default 0)
maxH (int) – max height to draw (default 0)
offX (int) – x-offset in image (default 0)
offY (int) – y-offset in image (default 0)
scaleX (bool) – scale horizontally (default True)
scaleY (bool) – scale vertically (default False)
UiFlow2 Code Block:
MicroPython Code Block:
Display.drawPng("res/img/uiflow.png", 0, 0)
Example:
Display.drawPng("res/img/uiflow.png", 0, 0)
img = open("res/img/uiflow.png", "b")
img.seek(0)
Display.drawPng(img.read(), 0, 100)
img.close()
- drawJpg(img, x, y, maxW, maxH, offX, offY)
Draw a JPG image.
- Parameters:
UiFlow2 Code Block:

MicroPython Code Block:
Display.drawJpg("res/img/uiflow.jpg", 0, 0)
Example:
Display.drawJpg("res/img/uiflow.jpg", 0, 0)
img = open("res/img/uiflow.jpg", "b")
img.seek(0)
Display.drawJpg(img.read(), 0, 100)
img.close()
- drawBmp(img, x, y, maxW, maxH, offX, offY)
Draw a BMP image.
- Parameters:
UiFlow2 Code Block:

MicroPython Code Block:
Display.drawBmp("res/img/uiflow.bmp", 0, 0)
Example:
Display.drawBmp("res/img/uiflow.bmp", 0, 0)
img = open("res/img/uiflow.bmp", "b")
img.seek(0)
Display.drawBmp(img.read(), 0, 100)
img.close()
- drawImage(img, x, y, maxW, maxH, offX, offY)
Draw an image.
- Parameters:
UiFlow2 Code Block:
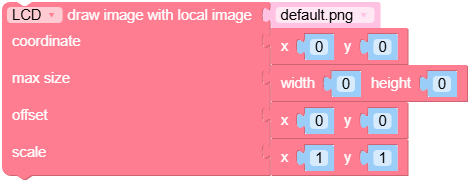
MicroPython Code Block:
img = open("res/img/uiflow.jpg", "b")
Example:
img = open("res/img/uiflow.jpg", "b")
img.seek(0)
Display.drawImage(img.read(), 0, 0)
img.close()
- drawRawBuf(buf, x, y, w, h, len, swap)
Draw an image from raw buffer data.
- Parameters:
UiFlow2 Code Block:
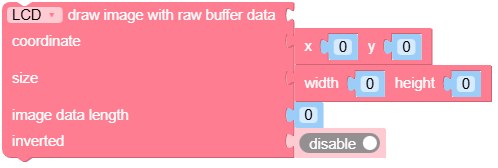
MicroPython Code Block:
Display.drawRawBuf(raw_buf, 0, 0, 100, 100, len(raw_buf), swap=False)
Example:
width, height = 40, 30
green565 = 0x07E0
raw_buf = bytearray(width * height * 2)
for i in range(width * height):
    raw_buf[2*i]   = (green565 >> 8) & 0xFF
    raw_buf[2*i+1] = green565 & 0xFF
Display.drawRawBuf(raw_buf, 100, 100, width, height, len(raw_buf), swap=False)
- print(text, color)
Display a string (no formatting support).
UiFlow2 Code Block:

MicroPython Code Block:
Display.print("Hello World", color=0xFF0000)
- printf(text)
Display a formatted string.
- Parameters:
text (str) – text to display with formatting
UiFlow2 Code Block:

MicroPython Code Block:
Display.printf("Value: %d" % 100)
- newCanvas(w, h, bpp, psram)
Create an off-screen canvas. Use it to compose a complete animation frame before presenting the frame with a single
push(x, y)call. Reuse the returned object instead of creating it repeatedly in the main loop.- Parameters:
- Returns:
created canvas object
UiFlow2 Code Block:
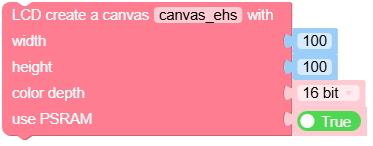
MicroPython Code Block:
w1 = Display.newCanvas(w=100, h=100, bpp=16)
Example:
w1 = Display.newCanvas(w=100, h=100, bpp=16)
w1.drawImage("res/img/uiflow.jpg", 80, 0)
w1.push(30, 0)
- startWrite()
Start writing to the display.
UiFlow2 Code Block:

MicroPython Code Block:
Display.startWrite()
Example:
Display.startWrite()
Display.drawPixel(10, 10, 0xFF0000)
Display.endWrite()
- endWrite()
End writing to the display.
UiFlow2 Code Block:

MicroPython Code Block:
Display.endWrite()