M5Canvas
M5Canvas是一个强大的图形控件,提供可绘制的表面,用于在用户界面中创建自定义图形、动画和视觉效果。它支持绘图操作、图像管理和高级图形渲染。
UiFlow2 应用示例
draw basic shapes
在UiFlow2中打开 cores3_canvas_basic_example.m5f2 项目。
此示例演示如何创建画布并绘制矩形、圆形和线条等基本图形。
UiFlow2 代码块:

示例输出:
包含各种彩色图形的画布,包括矩形、圆形和线条。
MicroPython示例
draw basic shapes
此示例演示如何以编程方式创建画布并绘制基本图形。
MicroPython 代码块:
 1# SPDX-FileCopyrightText: 2025 M5Stack Technology CO LTD
 2#
 3# SPDX-License-Identifier: MIT
 4
 5import os, sys, io
 6import M5
 7from M5 import *
 8import m5ui
 9import lvgl as lv
10
11
12page0 = None
13canvas0 = None
14
15
16def setup():
17    global page0, canvas0
18
19    M5.begin()
20    Widgets.setRotation(1)
21    m5ui.init()
22    page0 = m5ui.M5Page(bg_c=0xFFFFFF)
23    canvas0 = m5ui.M5Canvas(
24        x=83,
25        y=53,
26        w=150,
27        h=70,
28        color_format=lv.COLOR_FORMAT.ARGB8888,
29        bg_c=0xC9C9C9,
30        bg_opa=255,
31        parent=page0,
32    )
33
34    page0.screen_load()
35    canvas0.draw_arc(0, 0, 10, color=0x6600CC, opa=255, width=2, start_angle=0, end_angle=90)
36    canvas0.draw_rect(
37        0,
38        0,
39        20,
40        20,
41        0,
42        bg_c=0xFF0000,
43        bg_opa=255,
44        border_c=0xFF0000,
45        border_opa=255,
46        border_w=0,
47        border_side=lv.BORDER_SIDE.FULL,
48        outline_c=0x6600CC,
49        outline_opa=255,
50        outline_w=0,
51        outline_pad=0,
52        shadow_c=0x6600CC,
53        shadow_opa=255,
54        shadow_w=0,
55        shadow_offset_x=0,
56        shadow_offset_y=0,
57        shadow_spread=0,
58    )
59    canvas0.draw_line(0, 0, 50, 50, color=0x6600CC, opa=255, width=1)
60
61
62def loop():
63    global page0, canvas0
64    M5.update()
65
66
67if __name__ == "__main__":
68    try:
69        setup()
70        while True:
71            loop()
72    except (Exception, KeyboardInterrupt) as e:
73        try:
74            m5ui.deinit()
75            from utility import print_error_msg
76
77            print_error_msg(e)
78        except ImportError:
79            print("please update to latest firmware")
示例输出:
显示不同颜色几何图形的画布。
API参考
M5Canvas
- class m5ui.canvas.M5Canvas(*args, **kwargs)
基类:
canvas创建用于绘图的画布控件。
- 参数:
- set_flag(flag, value)
为对象设置标志。如果
value为True,则添加标志;如果为False,则移除标志。UiFlow2 代码块:

MicroPython 代码块:
canvas_0.set_flag(lv.obj.FLAG.HIDDEN, True)
- toggle_flag(flag)
切换对象上的标志。如果标志已设置,则移除它;如果未设置,则添加它。
- 参数:
flag (int) – 要切换的标志。
- 返回:
None
UiFlow2 代码块:

MicroPython 代码块:
canvas_0.toggle_flag(lv.obj.FLAG.HIDDEN)
- set_pos(x, y)
设置画布的位置。
UiFlow2 代码块:

MicroPython 代码块:
canvas_0.set_pos(100, 100)
- set_x(x)
设置画布的x坐标。
- 参数:
x (int) – 画布的x坐标。
- 返回:
None
UiFlow2 代码块:

MicroPython 代码块:
canvas_0.set_x(100)
- set_y(y)
设置画布的y坐标。
- 参数:
y (int) – 画布的y坐标。
- 返回:
None
UiFlow2 代码块:

MicroPython 代码块:
canvas_0.set_y(100)
- align_to(obj, align, x, y)
将画布对齐到另一个对象。
- 参数:
- 返回:
None
UiFlow2 代码块:

MicroPython 代码块:
canvas_0.align_to(page_0, lv.ALIGN.CENTER, 0, 0)
- set_size(width, height)
设置画布的尺寸。
UiFlow2 代码块:

MicroPython 代码块:
canvas_0.set_size(200, 100)
- set_width(width)
设置画布的宽度。
- 参数:
width (int) – 画布的宽度。
- 返回:
None
UiFlow2 代码块:

MicroPython 代码块:
canvas_0.set_width(200)
- set_height(height)
设置画布的高度。
- 参数:
height (int) – 画布的高度。
- 返回:
None
UiFlow2 代码块:

MicroPython 代码块:
canvas_0.set_height(100)
- get_width()
获取画布的宽度。
- 返回:
画布的宽度。
- 返回类型:
UiFlow2 代码块:

MicroPython 代码块:
width = canvas_0.get_width()
- get_height()
获取画布的高度。
- 返回:
画布的高度。
- 返回类型:
UiFlow2 代码块:

MicroPython 代码块:
height = canvas_0.get_height()
- fill_bg(color, opa)
用指定的颜色和不透明度填充画布背景。
UiFlow2 代码块:

MicroPython 代码块:
canvas_0.fill_bg(0x001122, 255)
- set_px(x, y, color, opa)
在(x, y)位置设置具有指定颜色和不透明度的像素。
- 参数:
UiFlow2 代码块:

MicroPython 代码块:
canvas_0.set_px(100, 100, 0xFF0000, 255)
- get_px_color(x, y)
获取(x, y)位置像素的颜色。
UiFlow2 代码块:

MicroPython 代码块:
color = canvas_0.get_px_color(100, 100)
print(hex(color))  # Prints the color in hexadecimal format
- get_px_opa(x, y)
获取(x, y)位置像素的不透明度。
UiFlow2 代码块:

MicroPython 代码块:
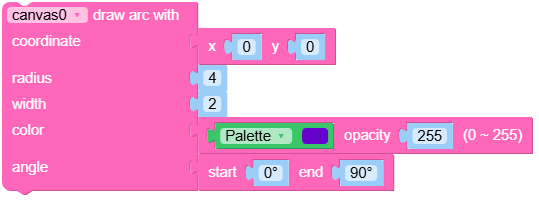
- draw_arc(x, y, r, color=0, opa=lvgl.OPA.COVER, width=1, start_angle=0, end_angle=90)
在画布上绘制弧形。
- 参数:
UiFlow2 代码块:
MicroPython 代码块:
canvas_0.draw_arc(100, 100, 50, 0xFF0000, 255, 2, 0, 180)
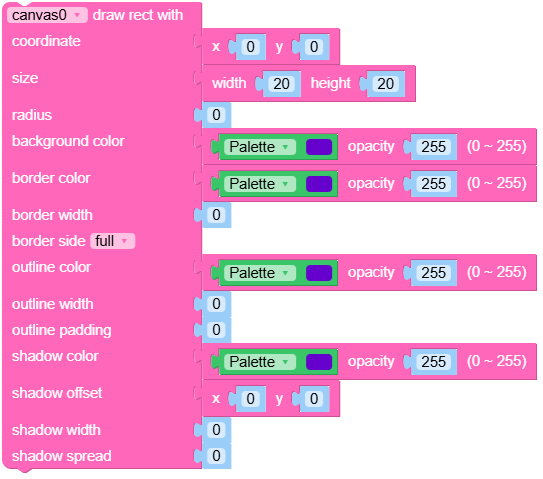
- draw_rect(x, y, w, h, radius=0, bg_c=16777215, bg_opa=lvgl.OPA.COVER, border_c=16777215, border_opa=lvgl.OPA.COVER, border_w=0, border_side=lvgl.BORDER_SIDE.FULL, outline_c=0, outline_opa=lvgl.OPA.COVER, outline_w=0, outline_pad=0, shadow_c=0, shadow_opa=lvgl.OPA.COVER, shadow_w=0, shadow_offset_x=0, shadow_offset_y=0, shadow_spread=0)
在画布上绘制矩形。
- 参数:
x (int) – 矩形的x坐标。
y (int) – 矩形的y坐标。
w (int) – 矩形的宽度。
h (int) – 矩形的高度。
radius (int) – 矩形的圆角半径。
bg_c (int) – 十六进制格式的矩形背景颜色(例如,0xRRGGBB)。
bg_opa (int) – 背景的不透明度(0-255)。
border_c (int) – 十六进制格式的矩形边框颜色(例如,0xRRGGBB)。
border_opa (int) – 边框的不透明度(0-255)。
border_w (int) – 边框的宽度。
border_side (int) – 要绘制的边框边(例如,lv.BORDER_SIDE.FULL)。
outline_c (int) – The outline color of the rectangle in hexadecimal format (e.g., 0xRRGGBB).
outline_opa (int) – The opacity of the outline (0-255).
outline_w (int) – The width of the outline.
outline_pad (int) – The padding of the outline.
shadow_c (int) – The shadow color of the rectangle in hexadecimal format (e.g., 0xRRGGBB).
shadow_opa (int) – The opacity of the shadow (0-255).
shadow_w (int) – The width of the shadow.
shadow_offset_x (int) – The horizontal offset of the shadow.
shadow_offset_y (int) – The vertical offset of the shadow.
shadow_spread (int) – The spread of the shadow.
UiFlow2 代码块:
MicroPython 代码块:
canvas_0.draw_rect(10, 10, 100, 50, radius=5, bg_c=0xFF0000,
                   bg_opa=255, border_c=0x00FF00, border_opa=255,
                   border_w=2, outline_c=0x0000FF, outline_opa=255,
                   outline_w=1, shadow_c=0x000000, shadow_opa=128,
                   shadow_w=5, shadow_offset_x=2, shadow_offset_y= 2,
                   shadow_spread=0)
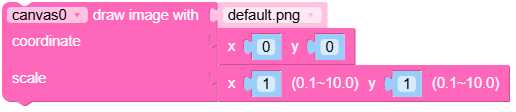
- draw_image(img_src, x=0, y=0, rotation=0, scale_x=1.0, scale_y=1.0, skew_x=0, skew_y=0)
在指定坐标绘制图像。
- 参数:
img_src (str) – 图像的源(例如,文件路径或图像对象)。
x (int) – 绘制图像的x坐标。
y (int) – 绘制图像的y坐标。
rotation (int) – The rotation angle of the image in degrees.
scale_x (float) – The horizontal scaling factor of the image.
scale_y (float) – The vertical scaling factor of the image.
skew_x (int) – The horizontal skew angle of the image in degrees.
skew_y (int) – The vertical skew angle of the image in degrees.
UiFlow2 代码块:
MicroPython 代码块:
canvas_0.draw_image("path/to/image.png", x=10, y=20, rotation=0,
                    scale_x=1.0, scale_y=1.0, skew_x=0, skew_y=0)
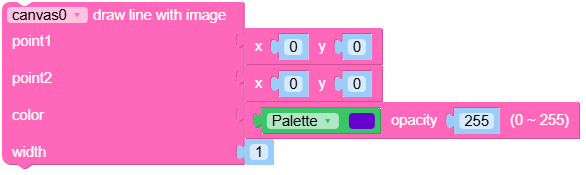
- draw_line(x1, y1, x2, y2, color=0, opa=lvgl.OPA.COVER, width=1)
从(x1, y1)到(x2, y2)绘制线条。
- 参数:
UiFlow2 代码块:
MicroPython 代码块:
canvas_0.draw_line(10, 10, 100, 100, color=0xFF0000, opa=255, width=2)
- draw_label(txt, x=0, y=0, font=lvgl.font_montserrat_14, color=0, opa=lvgl.OPA.COVER)
在给定坐标处绘制具有指定文本的标签。
- 参数:
UiFlow2 代码块:
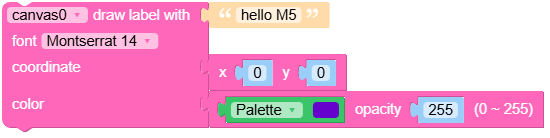
MicroPython 代码块:
canvas_0.draw_label("Hello, World!", x=10, y=20, font=lv.font_montserrat_14,
                    color=0xFFFFFF, opa=255)
- draw_triangle(x1, y1, x2, y2, x3, y3, bg_c=16777215, bg_opa=lvgl.OPA.COVER)
绘制具有指定顶点的三角形。
- 参数:
x1 (int) – 第一个顶点的x坐标。
y1 (int) – 第一个顶点的y坐标。
x2 (int) – 第二个顶点的x坐标。
y2 (int) – 第二个顶点的y坐标。
x3 (int) – The x-coordinate of the third vertex.
y3 (int) – The y-coordinate of the third vertex.
bg_c (int) – The background color of the triangle in hexadecimal format (e.g., 0xRRGGBB).
bg_opa (int) – The opacity of the triangle (0-255).
UiFlow2 代码块:

MicroPython 代码块:
canvas_0.draw_triangle(10, 10, 50, 10, 30, 40, bg_c=0xFF0000, bg_opa=255)