继电器
继电器用于控制主机设备的继电器。
UiFlow2 应用示例
继电器控制
在 UiFlow2 中打开 stamplc_relay_example.m5f2 项目。
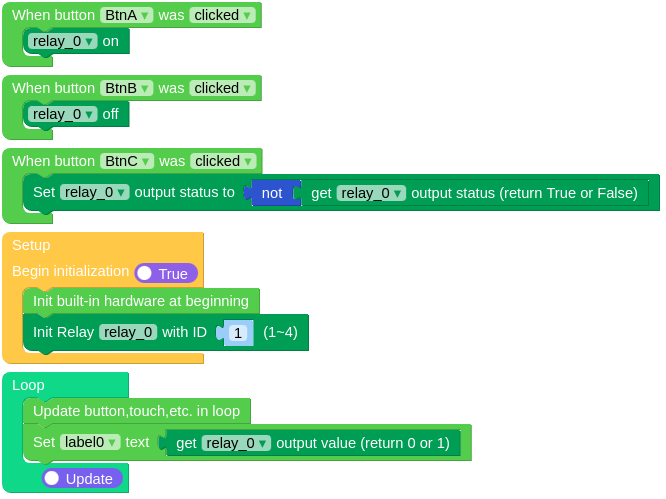
此示例演示如何使用按钮控制继电器的状态并在屏幕上显示继电器的状态值。
UiFlow2 代码块:
示例输出:
None
MicroPython 应用示例
继电器控制
此示例演示如何使用按钮控制继电器的状态并在屏幕上显示继电器的状态值。
MicroPython 代码块:
 1# SPDX-FileCopyrightText: 2025 M5Stack Technology CO LTD
 2#
 3# SPDX-License-Identifier: MIT
 4
 5import os, sys, io
 6import M5
 7from M5 import *
 8from hardware import Relay
 9
10
11label0 = None
12relay_0 = None
13
14
15def btnA_wasClicked_event(state):  #  noqa: N802
16    global label0, relay_0
17    relay_0.on()
18
19
20def btnB_wasClicked_event(state):  #  noqa: N802
21    global label0, relay_0
22    relay_0.off()
23
24
25def btnC_wasClicked_event(state):  #  noqa: N802
26    global label0, relay_0
27    relay_0.set_status(not (relay_0.get_status()))
28
29
30def setup():
31    global label0, relay_0
32
33    M5.begin()
34    label0 = Widgets.Label("label0", 75, 28, 1.0, 0xFFFFFF, 0x222222, Widgets.FONTS.DejaVu18)
35
36    BtnA.setCallback(type=BtnA.CB_TYPE.WAS_CLICKED, cb=btnA_wasClicked_event)
37    BtnB.setCallback(type=BtnB.CB_TYPE.WAS_CLICKED, cb=btnB_wasClicked_event)
38    BtnC.setCallback(type=BtnC.CB_TYPE.WAS_CLICKED, cb=btnC_wasClicked_event)
39
40    relay_0 = Relay(1)
41
42
43def loop():
44    global label0, relay_0
45    M5.update()
46    label0.setText(str(relay_0.value()))
47
48
49if __name__ == "__main__":
50    try:
51        setup()
52        while True:
53            loop()
54    except (Exception, KeyboardInterrupt) as e:
55        try:
56            from utility import print_error_msg
57
58            print_error_msg(e)
59        except ImportError:
60            print("please update to latest firmware")
示例输出:
None
API参考
继电器
- class Relay(id: int)
初始化继电器对象。
- 参数:
id (int) – The ID of the relay. The range of ID is 1-4.
UiFlow2 代码块:
继电器的ID,范围是1-4。
MicroPython 代码块:
from hadrware import Relay

relay = Relay(1)